MyBudget
Documentation
A complete guide to everything MyBudget can do — from your first login to advanced features like receipt scanning, shared household expenses, and price comparison.
Screenshots will be added for each section. Placeholders indicate where visuals will appear.
Contents
1. Getting started and account setup
When you open MyBudget for the first time, you can choose to sign in with an account or continue as a guest. Both options give you full access to the core features, but they behave differently when it comes to syncing your data across devices.
Sign-in options
Sign in with Apple
One tap using your Apple ID. Your email is kept private. Cloud sync is enabled automatically.
Email and password
Create an account with your email address. A verification email is sent before sync activates.
Guest mode
No account required. All data is saved locally on your device only. You can upgrade to an account at any time from Settings.
Onboarding (first-time setup)
After signing in, a short onboarding flow walks you through the three things that make the app most useful from day one:
- Add your income — Enter your take-home salary or other regular income so the app can calculate how much you have left each month.
- Set up budgets — Create spending limits for categories like Groceries, Petrol, and Entertainment. The app tracks progress in real time.
- Add your first transactions — Scan a receipt or manually add a few transactions to seed your history.
Cloud sync and offline use
MyBudget is offline-first. All your data is saved to the device immediately. When you are signed in and have an internet connection, the app silently syncs everything to the cloud so it is available on any other device you sign in to. Sync covers all data — transactions, receipts, budgets, income, debit orders, split bills, meals, fuel entries, events, and debts. If you go offline, the app works as normal and syncs the moment the connection returns.
2. Overview tab — your financial dashboard
Tab 1 The Overview tab is the first thing you see when you open the app. It gives you a snapshot of where you stand financially for the current month — without having to dig through individual transactions.
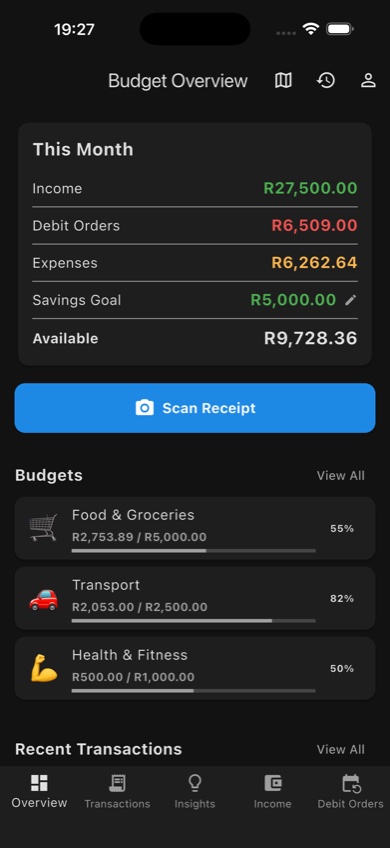
The Overview tab — income, debit orders, expenses, savings goal, available balance, budget progress, and recent transactions all on one screen
What you see on the Overview
| Section | What it shows |
|---|---|
| Monthly summary bar | Total income for the month, total spent so far, and the remaining balance. Debit orders are factored in. |
| Savings goal | Your target savings for the month and progress toward it. Set or change this in Settings. |
| Budget cards | Each active budget category is shown as a card with a progress bar, amount spent, and limit. Tap a card to see the transactions in that category. |
| Recent transactions | The latest few transactions so you can check recent spending at a glance. |
| Scan Receipt button | The fastest way to capture a receipt. Opens the camera directly. |
Quick actions from Overview
- Scan Receipt — opens the receipt scanner immediately (camera or gallery).
- View monthly history — scroll back through previous months to compare income and spending.
- Open the store map — see a map of where you have been spending.
- Open your profile — access account settings, data export, and account deletion.
3. Transactions tab
Tab 2 The Transactions tab is where every individual expense lives. You can view, add, edit, search, and filter transactions, and link them to receipts or budgets.
Transactions grouped by date (left) and by category (right)
Adding a transaction manually
- Tap the + button in the top right corner of the Transactions tab.
- Enter the amount, merchant name, and date.
- Select a category (e.g. Groceries, Petrol, Eating Out). Tap + in the category picker to create a custom category with an emoji.
- Optionally add a note or attach a receipt image.
- Tap Save in the top right to confirm.
Viewing and filtering
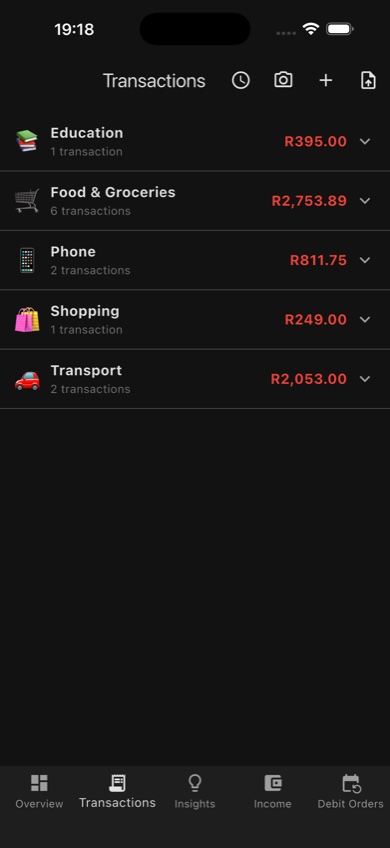
Transactions can be grouped two ways — tap the toggle at the top of the list to switch:
- By date — most recent transactions first, grouped by day.
- By category — grouped into folders by category so you can see total spending per category at a glance.
Use the search bar to find a specific merchant name or amount. Tap a transaction to open its detail screen where you can edit or delete it.
Category folder view — totals per category at a glance
Cash flow chart
Tap the chart icon in the Transactions tab AppBar to open the Cash Flow Chart. This shows your cumulative balance as a line chart for the current month — useful for seeing if spending is accelerating toward month end.
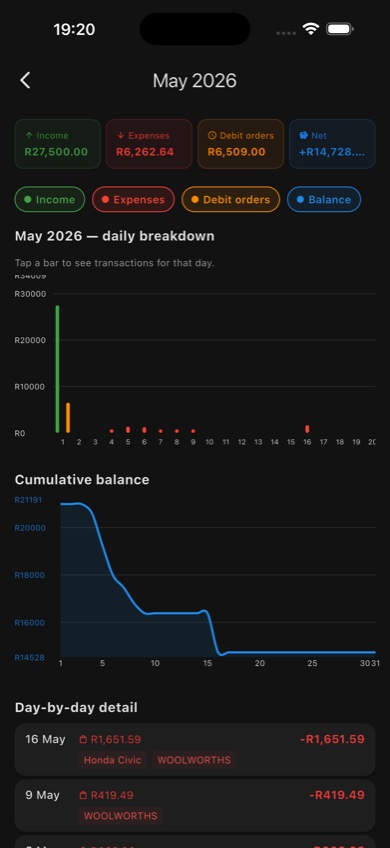
Cash flow chart — cumulative balance line for the month
Scan a receipt from Transactions
Tap the camera icon in the Transactions AppBar to go directly to the receipt scanner. Extracted items are automatically turned into transactions in the correct category. See the Receipt scanning section for the full flow.
4. Insights tab
Tab 3 The Insights tab is the analysis hub. It goes beyond simple totals and shows you patterns, comparisons, and tools that help you understand and improve your financial habits.

The Insights hub — all analytics and tracking tools in one place
Price comparison
Every time you scan a receipt, MyBudget records the price of each line item and which store you bought it from. The Price Comparison screen uses this history to show you when the same product is available cheaper elsewhere.
- See a price history chart for any item you regularly buy.
- Compare your price across stores — e.g. 1 kg mince at Woolworths vs Spar.
- Spot when an item is on special vs its usual price.
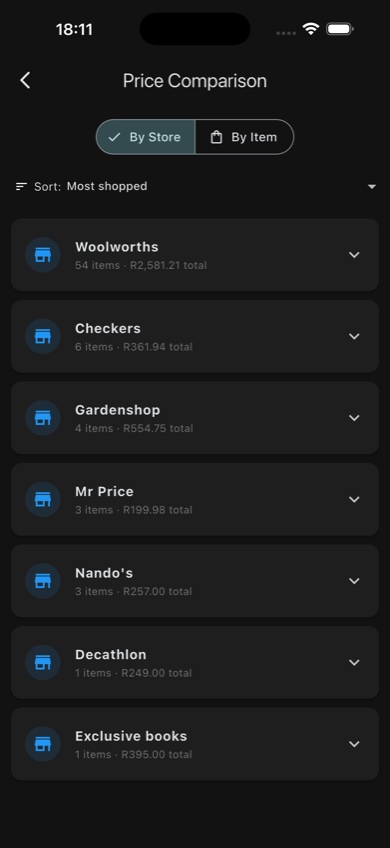
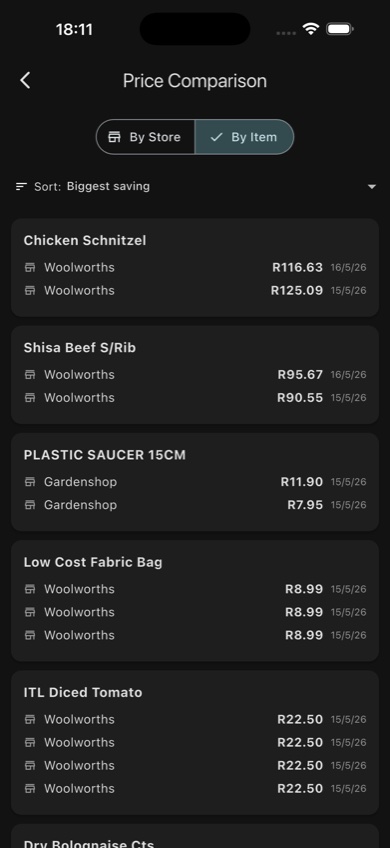
Compare by store (left) or drill into a specific item across dates (right)
Store specials
MyBudget detects when items you regularly buy have dropped in price at a store. You can follow specific stores to receive push notifications when prices on your regular items change. See Notifications for setup.
Split bills
The Split Bills section tracks money other people owe you. Splits can be created in several ways — directly from a receipt, from within a Meal or Event, or added manually.
- Each split entry records the person, the item description, the amount, and whether it is settled.
- Tap a person's name to see everything they owe across all receipts and events.
- Send a payment reminder via WhatsApp directly from the app — it pre-fills the message with a full breakdown and your payment details.
- Mark individual items or all items for a person as settled in one tap.
- Splits created from Meals are automatically posted here when you save the meal.
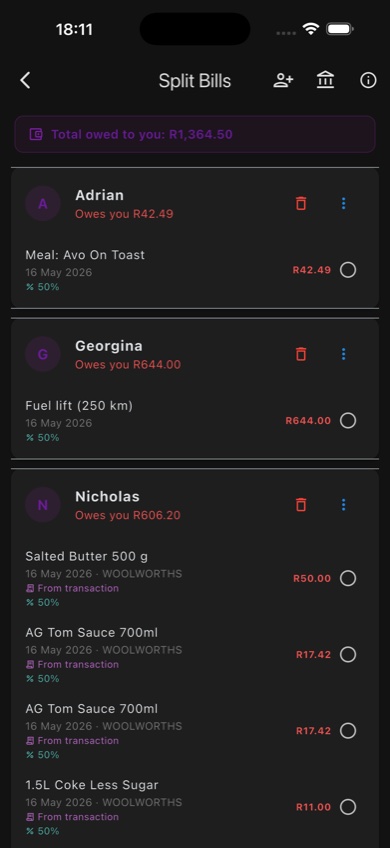
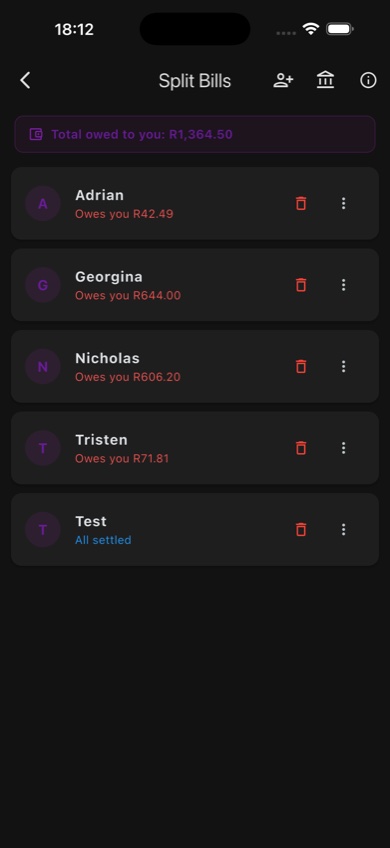
Split Bills overview (left) and expanded per-person breakdown with WhatsApp prompts (right)
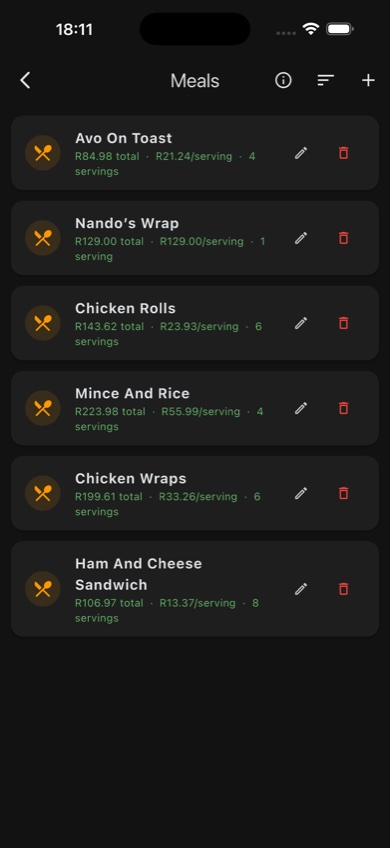
Meals list — total cost and cost per serving for each meal
The Meals screen lets you build a record of a meal — what went into it (ingredients from your receipts), how many servings it makes, and how to share the cost between the people who ate it.- Add ingredients by linking receipt line items directly to the meal — no manual typing.
- Set the number of servings to calculate the cost per serving automatically.
- Split the meal with one or more people by percentage or equal share.
- When you save a meal with a split, the split entries are automatically posted to Split Bills so they appear in the tracking section immediately.
- Tap Post to Split Bills on a meal card to push updated amounts once you have matched all the receipt items.
Fuel tracker
Log every fill-up and the app calculates your fuel economy over time, tracks cost trends, and shows how different vehicles or driving patterns affect efficiency.
- Add a fill-up — enter litres, total cost, and odometer reading. You can enter the odometer as a running total or as km driven since last fill.
- Edit fill-ups — tap the edit icon on any entry to correct a mistake.
- Economy chart — a trend graph shows km/L (or L/100km or mpg) across fill-ups so you can see if your vehicle's efficiency is improving or declining.
- Multiple vehicles — give each fill-up a vehicle name to track separate vehicles independently.
- Unit toggle — switch between km/L, L/100km, and mpg (UK or US) in Profile → Settings.
- Fuel trip splits — log km driven together with a passenger and the app calculates their share of the fuel cost. The split entry is automatically added to Split Bills.
- Station name is captured for reference and can be pre-filled from a scanned receipt.
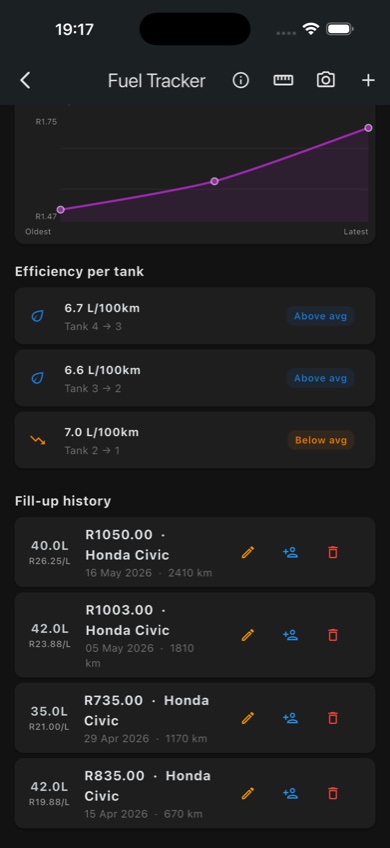
Fuel Tracker stats with price and economy charts (left), efficiency per tank and fill-up history (right)
Events
Group spending under a named event — a weekend away, birthday dinner, road trip, or work conference. Events let you see the total cost of any occasion and track who owes what within it.
- Create an event with an optional date range and notes.
- Assign transactions to the event, then drill into individual line items from those receipts.
- For each line item, assign a split to a person (by percentage or quantity) — e.g. "James gets 40% of the lamb chops".
- The event summary panel shows each person's running total and the full unsettled amount.
- Tap Settle all for a person to mark everything they owe as paid.
- Send a payment prompt via WhatsApp from the summary — pre-filled with the event name and itemised breakdown.
Events — group costs under a trip or occasion, with per-person splitting and fuel trip support
Debts — Who I Owe
The "Who I Owe" section is the flip side of Split Bills — it tracks money you owe to other people, not money owed to you.
- Add a debt with the creditor's name, description, amount, and an optional due date.
- Tap Mark paid when you have settled a debt — it moves to history.
- Undo a payment if you recorded it by mistake.
- Active debts show a total of everything you currently owe across all creditors.
Cash flow chart
A cumulative balance chart for the current month, also accessible directly from the Transactions tab. Useful for seeing spending velocity and projecting where you will end up at month end.
Spending trends
Month-over-month comparison of spending by category. See which categories are growing, which are shrinking, and how the current month compares to your average.
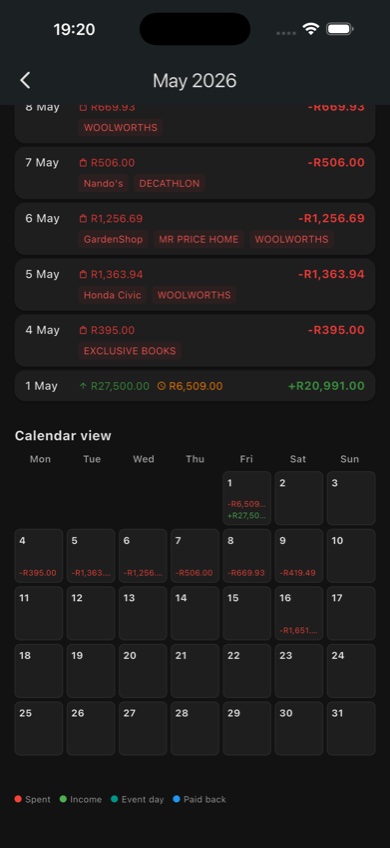
Monthly history
Scroll back through any previous month. See total income, total expenses, net position, and a category breakdown for that month.
5. Income tab
Tab 4 The Income tab tracks all the money coming in. Accurate income data is what makes the Overview's "remaining balance" calculation meaningful.

Income tab (left) and Debit Orders tab (right) — both feed into the monthly Overview total
Adding income
Tap + to add an income entry. You can record:
- Recurring income — salary, freelance retainer, rental income. Set the amount and which day of the month it arrives.
- Once-off income — a bonus, tax refund, birthday money, or anything that only happens once.
Tax calculator
When adding a salary entry, you can open the built-in CTC/PAYE tax calculator. Enter your Cost to Company (CTC) and the calculator works out your estimated take-home pay after tax and UIF — so you can enter the correct net amount without guessing.
Income tab — monthly total including salary, side income, and once-off amounts
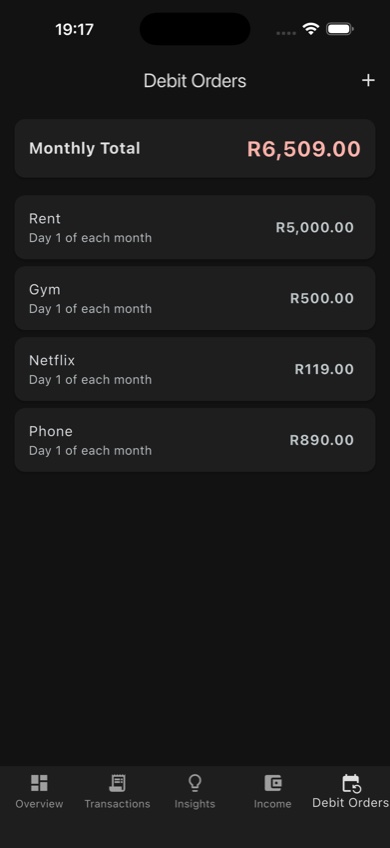
6. Debit orders tab
Tab 5 Debit orders are fixed recurring expenses that leave your account automatically each month — rent, gym, insurance, streaming subscriptions, and so on. Tracking them separately from transactions keeps the Overview's "remaining balance" accurate because the app knows to reserve this money.
Debit Orders tab — fixed monthly costs with day-of-month displayed
Adding a debit order
- Tap + in the top right corner.
- Enter the name (e.g. "Gym — Virgin Active"), amount, and category.
- Use the visual calendar grid to pick the day of the month the debit runs (e.g. the 1st, the 15th).
- Tap Save.
The Overview tab immediately reflects the new debit order in the monthly budget summary. Debit orders do not appear in the Transactions tab automatically — they are a separate, fixed-cost layer so you can see what is truly discretionary.
Debit orders are also counted toward the spending total of the budget category you assign them to. For example, a gym debit order assigned to "Health & Fitness" will count against that budget limit alongside your regular transactions in that category, giving you a true picture of what you spend in each area.
7. Receipt scanning
Receipt scanning is one of the most powerful features in MyBudget. Instead of just capturing the total, it reads every line item on the receipt — so you know exactly what you spent on mince vs yoghurt vs cleaning products, without typing anything.
How to scan a receipt
- Tap Scan Receipt on the Overview tab, or tap the camera icon in the Transactions tab AppBar.
- Take a photo of the receipt using your camera, or choose an existing photo from your gallery.
- MyBudget sends the image to its AI (Google Gemini) via a secure cloud connection. This takes a few seconds.
- A confirmation screen shows every extracted line item: name, quantity, and price. Review these carefully — AI extraction is highly accurate but not perfect.
- Correct any mistakes by tapping a line item to edit. You can change the name, quantity, unit price, and discount. Tap the copy icon on any row to duplicate it — useful when the AI misses repeated identical items.
- Delete any items that were extracted incorrectly by swiping left on the row.
- Tap Confirm to save all items as transactions. Each item is automatically assigned to the most relevant category.
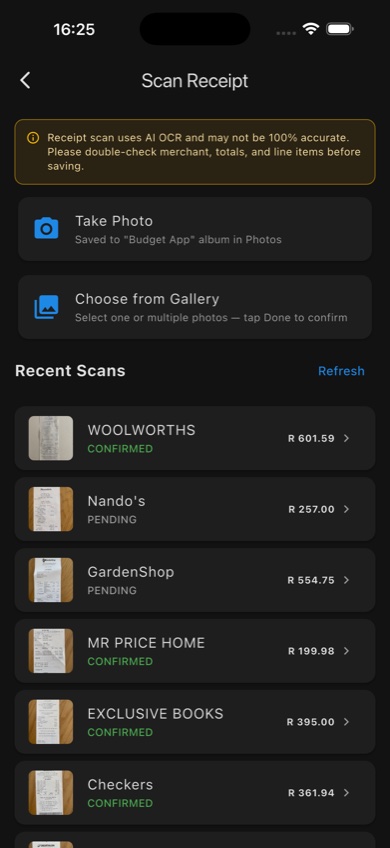
Scan Receipt screen — recent scans with confirmation status
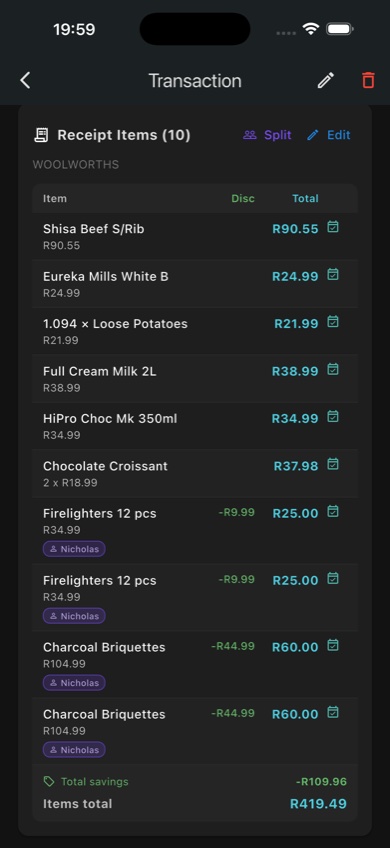

Confirmation screen showing the original receipt photo and extracted details (left), and line items with split assignments (right)
Location tagging and editing
If you have granted location permission, MyBudget attaches your current location to the receipt scan. This identifies the store on the in-app map and improves price comparison accuracy. Location is only captured at the moment of scanning — the app does not track your location at any other time.
If the app picks up the wrong location (this can happen in malls or when GPS is slightly off), tap the location pill on the confirmation screen to open the location editor. You can search for the correct store name or drag the map pin to the right spot before saving.
AI scan limits
Free accounts can perform up to 30 AI-powered scans per day. This is enough for the vast majority of users. Limits may be adjusted as the app evolves.
Privacy and receipt images
Receipt images are sent securely to MyBudget's cloud for AI processing and are not stored by Google beyond their standard data handling. If you have opted in to data collection in Settings > Data & Privacy, anonymised and hashed scans may be retained to improve AI accuracy. You can opt out at any time. See the Privacy Policy for full details.
8. Budgets
Budgets let you set spending limits per category for a week, a month, or a year. Once set, MyBudget tracks every transaction in that category against the limit and shows your progress in real time.
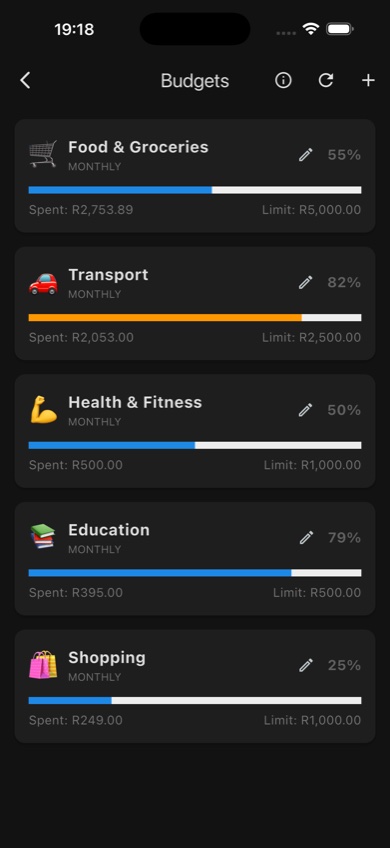
Budget cards — amber when close to the limit, red when over
Creating a budget
- From the Overview tab, tap the budget section or navigate to Budgets from the top.
- Tap + to create a new budget.
- Select a category (e.g. Groceries) or create a new one.
- Set the spending limit and choose whether it resets weekly, monthly, or yearly.
- Tap Save.
Budget progress
Each budget card shows:
- How much you have spent in the category so far this period.
- The limit you set.
- A progress bar that turns amber when you reach 80% of the limit and red when you exceed it.
The spent total includes transactions, scanned receipt line items in that category, and any debit orders assigned to the same category. This means your Groceries budget, for example, shows the true monthly spend including your regular grocery store debit if you have one set up.
Tap a budget card to see exactly which transactions counted toward it.
Budget detail — tap any budget card to see the transactions counted toward it
Custom categories
The built-in categories cover most spending patterns, but you can create your own. In the category picker (when adding a transaction or creating a budget), tap the + button to add a category with a custom name and emoji icon.
10. Household and shared expenses
The Household feature lets multiple people — flatmates, a couple, family members — share a space for tracking joint expenses. Each person keeps their own personal transactions private, and only shared items are visible to everyone in the household.
Setting up a household
- Go to Profile (top right on the Overview tab) and tap Household.
- Create a new household and give it a name.
- Share the invite link or code with the people who should join.
- Once they accept, shared transactions you add are visible to everyone in the household.
Important notes
- A signed-in account is required to use the Household feature — it cannot work in guest mode.
- Settlement confirmations within the app are acknowledgements between users and do not constitute legally enforceable agreements.
- Each person in the household can see shared transactions only — personal transactions remain private.
11. Store map
The Store Map is accessible from the Overview tab. It displays a map of every merchant location linked to your receipt scans, shown as pins. Clusters expand when you zoom in to individual stores.
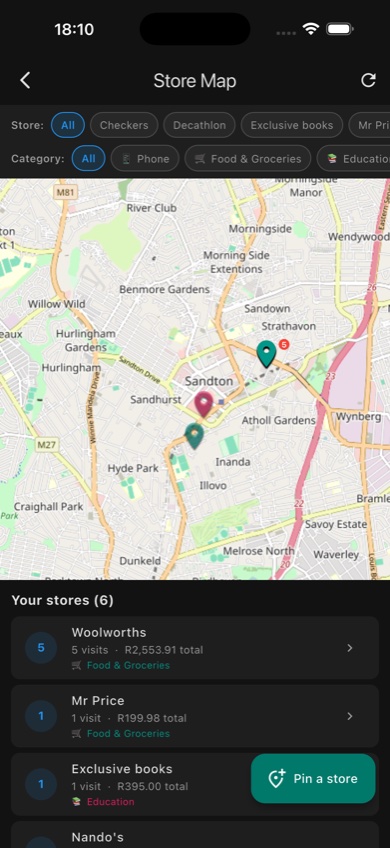
Store Map — clustered merchant pins with store visit counts and spend totals
Tap a pin to see the store name and your total spending there. This gives you a geographic view of your spending habits — for example, you might notice you spend far more at a Woolworths near work than at the one near home.
12. Notifications and store alerts
MyBudget can send you push notifications for price changes and store specials on items you regularly buy. Notifications are optional and require your permission when first prompted.
How to follow a store
- Open the Store Specials section in the Insights tab.
- Find a store you want to follow (stores you have visited based on receipt data are listed first).
- Tap Follow. You will receive a notification when a price change is detected on an item you have previously bought at that store.
You can unfollow a store at any time by returning to this screen and tapping Unfollow, or by disabling MyBudget notifications entirely in your device's Settings app.
13. Profile and settings
Tap your profile icon in the top right of the Overview tab to access all account and privacy settings.
Account settings
- Sign out — signs you out and keeps local data on the device.
- Delete account & data — permanently deletes your Firebase account and all associated cloud data. Local device data is also cleared. This cannot be undone.
- Export my data — downloads a copy of all your data for safekeeping.
Data & Privacy settings
- Receipt data collection — opt in or out of anonymised receipt data being used to improve AI accuracy.
- Analytics — opt out of anonymised usage analytics (Firebase Analytics).
Legal
The Profile screen links directly to the full Privacy Policy and Terms of Service inside the app. You can also access them at budgetapp.co.za/legal.
14. Troubleshooting
Receipt scan failed or extracted the wrong amounts
- Ensure the receipt is flat and fully visible in the frame.
- Improve lighting — avoid scanning in dim conditions or with a flash that washes out text.
- If the result is wrong, edit individual line items on the confirmation screen before saving.
- If the scan consistently fails for a specific receipt type, email support-budget.app@logicalsolutionsinnovations.com with an example photo and we will investigate.
Transactions are missing after signing in on a new device
- Cloud sync may still be in progress. Wait a few minutes and pull down on the transaction list to refresh.
- Check that you are signed in with the same account (not a second Apple ID or a different email).
- If data is still missing after 10 minutes, contact support.
The app is slow or crashing
- Update to the latest version of MyBudget from the App Store.
- Restart the app fully (close from the app switcher, then reopen).
- Restart your device.
- If the problem persists, tap Report a crash in Settings or email support-budget.app@logicalsolutionsinnovations.com with your device model and iOS version.
Still need help?
Visit the Support page or email support-budget.app@logicalsolutionsinnovations.com. Typical response time is within 24–48 hours.